|
The Zeltsman Approach to Traditional Classic Portraiture Chapter 15 Traditional Portrait of the Bride It is interesting to note, although our dress code has changed drastically throughout the last several decades, to the present day trend of "anything goes" casual wear for all occasions, the wedding dress code still remains traditionally the same. The bride of today, just as brides always have done, goes shopping for a bridal gown, styled to reflect the traditional yesteryear elegance. Regardless where and how her wedding is photographed in today’s style, one traditional touch ought to remain a part of it: A Formal Classic Full Length Portrait of the Bride, looking radiant in her elegantly styled gown, for her children, and her children’s children to see in later years. Note: The Following illustrations and comments are offered here specifically for creating that formal classic portrait of the Bride in her gown as she looked on her wedding day. Although the illustrations used here were made in a camera room environment, these posing guidelines also apply fully anywhere on location, indoor or out. Posing the Bride Standing in Full Length
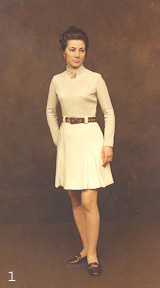
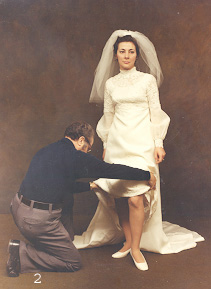
The most effective way to begin arranging a full length standing pose, is to position the subject’s feet first, as shown in photo-1. As you see, her left foot is in front, toe facing forward. Her right leg is moved a bit behind, with the toe turned slightly to her right. That turn of her right toe causes her body to turn slightly to her right, and the turn of the head toward the near shoulder completes this pose. She is in a precise feminine composition. ((Fully detailed instructions in Chapter 6, Posing Women) The important point made here is: - Every full length standing pose begins by arranging the subject’s feet, as shown in this illustration. Obviously, when a bride’s feet are concealed under the bridal gown, you have no way of knowing whether she placed them as you directed. I always checked by lifting the gown as shown in photo-2, and could make corrections if necessary. Note, as I looked at her feet here, I completed the arrangement by having her drop her weight on to the back foot, and roll her front foot a bit to the side to cause her knee into a slight bend.
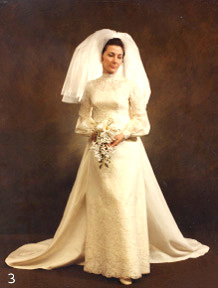
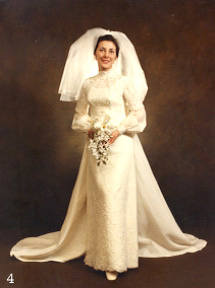
Photo-3 shows now how the position of the feet and the slightly bent front knee sets off the styling of the gown. Her feet were positioned to show the front of the gown and her figure, and to allow a slight turn of her head to show the two-thirds view of her face. Now, note the difference in the position of the toe of her foot in these two photos. Photo-4 shows the toe facing more forward, and as you see, her figure is now turned slightly more to her right, and we now see the front view of her face. This is one and the same pose in both illustrations. Nothing has been changed. It was done simply by directing the bride to turn both her feet as they were arranged in photo-3, very slightly to her right. Thus, you control the turns of a subject’s body in full length poses, simply by adjusting the turn of the feet. (Men or Women)
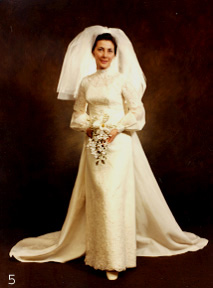
The formal bridal portrait session begins, by arranging the bride in the pure basic feminine composition shown in photo-5. That, at the very start, provides the most important view of the style of the gown, the bride’s figure, the flowers, and the veil. The body in this pose is in just a slight turn to her right, to allow for the turn and tilt of the head toward the near shoulder, showing the front view of her face. At this point you take a few moments for a look at this pose from four other angles. Examine the pose as you look at it standing in front of each of the other four facial angles.
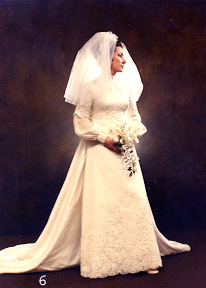
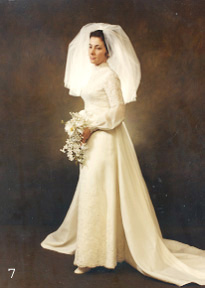
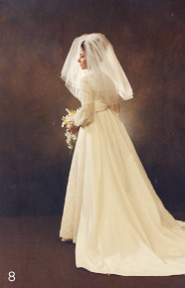
Photo-6 shows what that pose looks like from a position standing directly in front of her right profile. Photo-7, the same pose, as seen from the position standing directly in front of her left two-thirds view of the face. And photo-8, same pose, as seen from the position looking at her left profile. You will, of course, accept or reject the available variations of the basic pose, depending on the styling of the gown, and the bride’s figure. An integral part of the feminine composition is a slight turn of the subject’s head toward either one or the other shoulder. That means each of the five specific views of the face can be photographed supported by one of two different views of the gown. Photo-9 is the same pose with her head turned toward her left shoulder, showing the left two-thirds view of her face, and the view of the gown from that angle. Photo-10 shows a reversal of that pose. The position of her feet is reversed. The left foot moves back and toe turned slightly to the left. Her weight is shifted on to the left foot, and the right foot moves a bit forward with the knee bent slightly to the left. Everything falls into place, and the pose is completed by turning her head toward her right shoulder. Now, as you look at her two-thirds view of the face, it is supported by a different view of her figure and gown. Point to remember: The one Feminine Composition provides a choice of 10 different poses: 5 with the head turned to one shoulder, and 5 more with the head turned to the other shoulder. Each of the five facial views may therefore be photographed in a choice of two body positions. That means: When you’ve arranged the bride in the basic frontal feminine pose, you can immediately evaluate that pose from all available 10 angles, as illustrated above, and choose the most effective pose or poses to photograph. Then, whatever pose or poses you decide to photograph, make several exposures of each pose, capturing a variety of expressions.
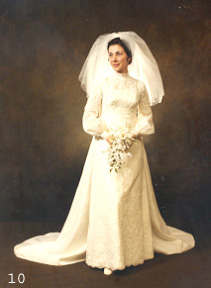
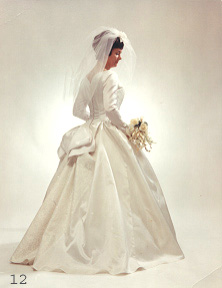
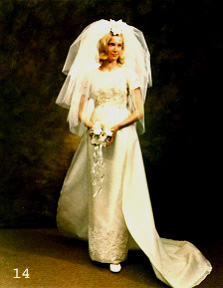
Almost every wedding ever booked by our studio, included a sitting of the bride about two weeks before her wedding day, or as soon as her gown was ready. I don’t know whether this still prevails, but it was customary throughout our area for many years, to have the bride’s photo appear in the newspapers on the day of the wedding. We needed to deliver glossies in time to meet newspaper deadlines. And that was also when we made the formal classic portraits of the bride. (Many sold in framed large sizes for wall hanging) Interestingly, I used to love to do high key bridals as in photo-12 above. But one day I decided to use a dark background, I don’t remember why. Perhaps a bride requested it. I then offered brides the choice of either, since I was able to show them samples of both. And almost without exception, brides chose the dark background. I still feel high key bridals are aesthetically more effective. But I also understand why most brides kept choosing the dark background. Compare the two photos above. I see photo-12 as a portrait of the bride. And I see photo-14 as a bridal portrait, Here is why! The strongest point that captures the viewer’s immediate attention at first glance in photo-12, is the subject‘s face and hair. That is a portrait of the bride! But the viewer’s immediate attention in photo-14 goes directly to the bride’s figure and gown. That is a bridal portrait! (Brides chose dark background because it featured their figure and gown) Explanation: Photography is a visual communication medium, and the contents of our images provide viewers with instant messages. What they see at a first glance at our image, should, of course, be what we planned for them to see. For example, in a first glance at the image, the viewer’s attention should immediately be drawn to the main point of interest in that image. And so, it is important, that we learn how to control composition, tonal coordination, background, props, and lighting, so that everything is subdued and leads the eye to the primary point of interest. I became aware of, and learned to speak this language of photography, many years ago, as the result of the incident of doing a bridal portrait against a dark background. (See Chapter 16) |

Rehosted on:
