|
The Zeltsman Approach to Traditional Classic Portraiture Chapter 13 Portrait Lighting - Part One (Individual subjects) Note: The information in this chapter deals only with my particular approach to portrait lighting, rather than with an overall coverage of various other lighting methods. First, I must explain why and how my approach to portrait lighting was developed. Watching competent photographers demonstrate their particular lighting techniques at Conventions and Seminars, I became aware that each photographer’s method of lighting and choice of equipment varied considerably, depending on whether their specialty was portraiture of men, women, brides, or children. I realized that each photographer perfected a method of lighting best suited to his/her specialty. Because it seemed impractical to me to adopt and use several different methods of lighting and equipment that would be needed to handle the full range of my sittings, I proceeded to develop and perfect a single universal method of portrait lighting in the studio, equally effective for portraiture of Men, Women, Children, Brides, and Groups. My method simply simulates the natural outdoor concept of lighting. First, the entire posing area in the camera room is flooded with overall soft lighting that surrounds the subject. And then by a judicial placement of a directional key light, a desired shadow pattern is created to bring out and emphasize the shape and form of the subject. This simulation of outdoor lighting offers two distinct advantages: One, it provides the roundness and three dimensional quality of natural outdoor lighting in studio portraiture. And two, when properly balanced, this method provides absolute lighting ratio control. Every conceivable lighting effect can be achieved with this single method, depending on where the key light is positioned, at what distance from the subject, and how the negative is exposed. Electronic Flash Equipment in the Camera Room Electronic flash equipment falls into two categories, and you should certainly be aware of the difference between them. The first category utilizes the concept of a single power pack providing power to several lamps. That means all the cables must reach out from the power pack to where the various lamps are positioned, creating considerable clutter on the camera room floor. But more importantly, the entire available power is distributed equally to the number of lamps plugged into the power supply, and it is not possible to control the intensity of each individual light separately as needed, other than by varying the lamp to subject distance. That is not particularly desirable because it changes the specular quality of the light. In the second category, each lamp has its own power supply, and can be switched on only when needed, without affecting the power output of the other lamps. Moreover, each individual unit offers a variety of power settings, and only the amount of power needed can be used, while maintaining a desired lamp to subject distance. Also, because each individual unit is equipped with a photocell, there are no interconnecting cables to clutter the floor, and each separate light can be plugged into an electrical outlet conveniently located near its desired position. One additional important feature of this type of equipment is its modeling light within the flash tube of each lamp, that show the exact lighting pattern, you will obtain when the flash is set off, allowing you to visually position each light accurately where needed. My lighting equipment is of this second category, consisting of the following: Two light units with 16-inch reflectors, equipped with barn doors. Both are used as key or modeling light, without diffusers. Two hair light units on booms, and one background light. A bounce light system, consisting of three power packs servicing six lamp units with 16-inch reflectors How I use this equipment I use the light unit with the 16-inch reflector as a key light, without diffusion over it. And because my method of lighting depends on total intensity of the key light directed evenly over the entire subject, when the key light is in position, I stand behind it and ascertain visually that the full light output is directed at the entire figure of the subject, regardless whether I intend to photograph just the head and shoulders pose, or a three quarter length pose. The reason behind this procedure is to eliminate variables, and to assure consistency in a pre planned contrast ratio of either pose. The hair light is a small controlled light source on a boom Its function, obviously, is to light the subject’s hair. The most effective position for this light is above and behind the subject’s head. But always on the same side as the key light. This placement precludes any possibility of distracting and undesirable light spills to appear on the shadow side of the face. Since I have two of these units, I can switch on one or the other, depending where the key light is positioned. Next the background light that is small enough to be concealed behind the subject, is positioned to provide evenly distributed lighting over the background, creating just a gentle glow directly behind the important area in the composition. Finally, I remind you that the key lighting and hair and background lighting is added to an already switched on fill lighting. (For complete details of the Fill Lighting Installation, see Chapter 12. It will provide you with details of the installation, and how it is used combined with the portrait lighting patterns in this chapter. Now I will explain how to achieve effective portrait lighting patterns with the key light, and show and identify each lighting by its known name. Please note: The terms used in naming each lighting as we go along have no special significance, other than for the purpose of identifying each lighting pattern. LIGHTING IN PHOTOGRAPHY In photographic terms, lighting is not mere illumination, but rather, a light that performs a special task. Using the main light source in a strategic relationship to an object, so its direction will create a shadow pattern, that will emphasize the shape and form of that object. That is the primary function of lighting in photography. In portraiture, where the subject’s face is of predominant importance, the main light source is positioned where its direction will create highlight and shadow patterns to bring out the shape and form of the face. That light source is referred to as the Key Light.
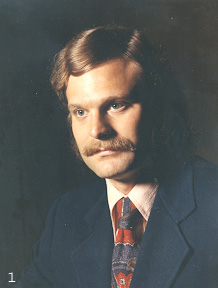
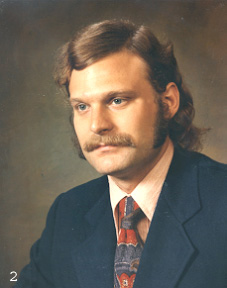
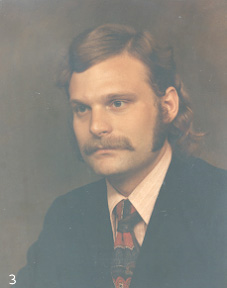
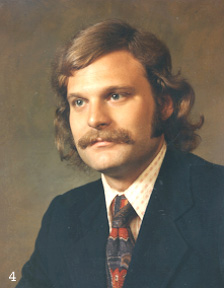
These two photos show the conventional approach to portrait lighting. First, the key light is positioned to establish the desired shadow pattern on the face, as illustrated in photo #1. Then additional lighting of considerably lesser intensity is directed at the face to lighten the shadows, more or less, as desired, shown in photo #2. Additional supporting lights like a hair light and a background light are added as needed. Absolutely nothing wrong with this method of lighting, and surely most people shall and will continue to use it. My method of lighting in our studio is actually a reversal of the normal conventional approach. First, the low density of the negative is established by the fill lighting, as illustrated in photo #3. Then, the key lighting of proper intensity is added to the already existing fill light foundation, to form a desired portrait lighting pattern, as shown in photo #4.
Why this method? Using a constant stationary fill lighting that covers the entire posing area, means that all poses, close up, mid distance, or groups, are exposed at the same lens aperture, assuring consistency in shadow density of the negatives, and absolute control of contrast ratios. Result? Top quality prints. Regardless which of the two above described methods is followed, the several portrait lighting patterns I will now describe, apply and depend on proper positioning of the key lighting. But in order to know how to position the key light, it is essential that you learn to see light, and learn to recognize the different portrait lighting patterns and effects as they appear on people’s faces, regardless of the type of light source used, or its position or distance from the subject. Portrait Lighting Patterns Important: The lighting equipment must be the type that provides modeling lights, allowing to visually establish desirable lighting patterns on a subject’s face. The position of the key light is therefore controlled entirely by whatever portrait lighting pattern you choose to establish on the subject’s face. (That should end the controversy about where the key light should be positioned in portraiture). Very important to understand the following:- First, you learn how to position the key light, to achieve the specific lighting patterns explained and illustrated here. But, when you work on location using existing light as a key light, the approach is reversed. You can not move the key light, and must, therefore, move and relate the subject to the light, to achieve the desired portrait patterns. The next 3 photos illustrate how a subject’s facial features are shaped by the placement of key lighting. That can only be done by looking at the face while manipulating the key light, and placing it where you achieve the desired effect.
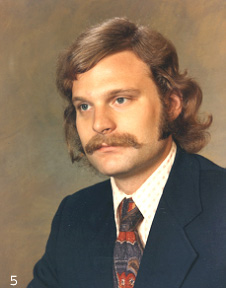
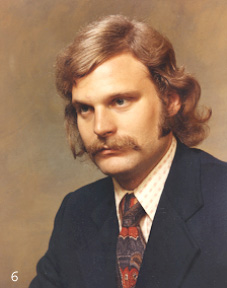
Photo #5 was lighted by placing the key light directly in front of the subject’s face, at his eye level. The result is a flat lighting that merely illuminates the face, but fails to establish any appreciable dimension. Yet just raising the key light a few feet above his eye level (still in the same position), several important dimensional changes are achieved, as illustrated in photo #6. Note how the new direction of light causes the subject’s eyes to recede back into the sockets. How the nose projects forward, the curvature of the chin is more pronounced, and the general appearance of the face is more three-dimensional.
But note how this key light position shaded the subject’s eyes, causing the eyes to appear dull and lifeless (#6). And now compare this with the effect in photo #7, showing detail and sparkle in the subject’s eyes, while the three dimensional effect of the facial features remains unchanged. The improved effect shown in this photo was achieved by lowering the key light just enough to allow the light to reach the eyes. A point to remember: While the key light is almost always directed at the subject’s face from above in portraiture to achieve vertical modeling, the height of the light must be restricted to a point where it will reach the subject’s eyes, and cause the small white spots, that we call catch lights, to appear in each eye as shown in this photo. Catch lights represent an essential part of good portrait lighting, because they give the eyes a life like quality and project the subject’s expression and personality. It is important therefore to position the key light at a height that will assure a catch light to appear in each eye. We’ll study the various portrait patterns now that you must learn to see and recognize. Butterfly Lighting
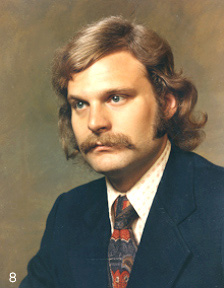
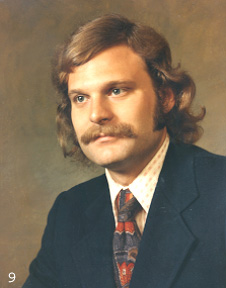
Lets review the lighting pattern in photo #8. The key light is positioned to light the front view of the subject’s face, then raised above eye level to achieve vertical modeling of the facial features, but with light reaching the subject’s eyes and causing catch lights to appear. This pattern of portrait lighting is commonly referred to as "Butterfly Lighting". But I must point out three negative aspects of this particular lighting pattern. First, because the key light is directed at the front of the face and from above, creating vertical shadows, only a vertical modeling of the facial features is achieved. Thus the face remains lacking in lateral modeling. Secondly, the frontal key light position always results in a distracting and undesirable light spill on the person’s ears. For example, note the distracting highlight on the small exposed portion of this subject’s left ear in this photo. Finally, this lighting pattern places catch lights in the 12 o’clock position, a least desirable place for catch lights. Clearly, the pure Butterfly Lighting as it is shown here offers limited results, and I never used it in lighting an individual subject. Modified Butterfly Lighting But by lowering the key light a bit from its original Butterfly pattern position, and moving it off to the side away from the camera, a very effective portrait lighting is achieved, as shown next in photo #9.
Study this illustration, and note the following pattern changes. As compared with the original Butterfly Lighting in photo #8, this new pattern in photo #9 shows the nose shadow moved to the side facing the camera, and became longer, forming a small loop. Also the side of the nose and the side of the face are infinitely more three dimensional. And note especially how this lighting brought out the true shape and form of the subject’s facial features. Finally, the catch lights in the eyes moved from the 12 o’clock place to a more attractive 11 o’clock position. I identify this pattern as Modified Butterfly Lighting. |
|
Broad Lighting and Short Lighting
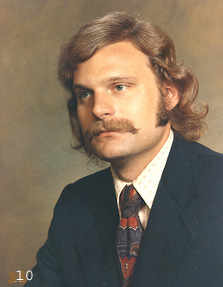
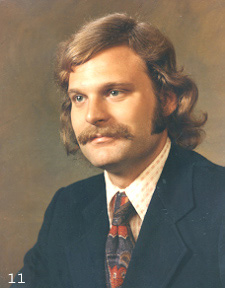
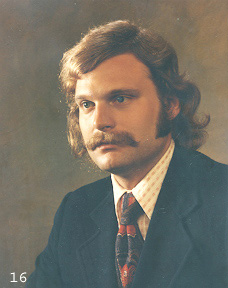
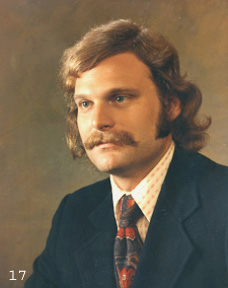
(We’ll discuss now two types of lighting commonly referred to in portraiture as Broad Lighting and Short Lighting. These terms apply only when the subject’s face is photographed in either one of the two side facial angles.) When the subject’s face is turned to the side as shown in photo #10, the broad portion of the face as measured from the back of the ear to the tip of the nose faces the camera, while the opposite side of the face becomes the short side of the face. When the key light is directed at the broad side of the face, as shown in this photo, the shadows fall away from the camera, and this lighting pattern is identified as Broad Lighting. And when the key light is directed at the short side of the face, as shown in photo #11, the shadows form on the broad side of the face, and this lighting pattern is identified as Short Lighting. The lighting patterns shown in these two photos illustrate the difference. First, as you examine the Broad Lighting effect on the subject’s face in photo #10, you realize, the lighting is quite flat, and fails to create any appreciable modeling of the subject’s facial features when the key light is directed at the broad side of the face. But when the key light is directed at the short side of the subject’s face, as shown in photo #11, the shadows form on the side facing the camera, modeling the shape and form of the subject’s facial features in a three dimensional effect. Also, this lighting places catch lights in the eyes on the side where the actual direction of the light is coming from. Surely you recognize the lighting in photo #11 as Modified Butterfly Lighting , "that is Short Lighting." After comparing the two lighting patterns in these photos, you will perhaps conclude, as I did, that Broad Lighting is not an effective portrait lighting. I never used it in my work. I believe that Short Lighting Portrait Patterns are the best choice for Formal Classic Portraiture. And we’ll proceed now to a look at other patterns of Short Lighting. Split Lighting The pattern of lighting we’ll discuss now is logically referred to as Split Lighting, because the key light is positioned to light only half of the face, up to the bridge of the nose. When applying this pattern of lighting to a front view of the face, the choice of which side to light is determined by the pose. But in side facial views, the key lighting is applied to the short side of the face up to the bridge of the nose only, while the entire broad side of the face remains in shadow, as illustrated in photo #16 below. Then, that special luminosity in the subject’s eyes in photo #17 is achieved by adjusting the height of the key light, as follows: First, lower the key light all the way down to the subject’s eyelevel as you light the short portion of the face only. Then after anchoring the subject’s eyes to a point where they appear properly centered as viewed from camera position, begin to move the key light very slowly in the direction toward the camera, causing some of the light to spill across the upper curvature of the nose, until a catch light appears in the eye on the shadow side of the face..
The ultimate result is illustrated in photo #17. A very effective portrait lighting, with a special sparkle in the eyes, and the only portrait lighting where the key light is not directed at the face from above. Consequently, because the key light is directed at the face at eye level, the catch lights appear in about 9 o’clock position. Of course, when the opposite side of the face is photographed, the lighting is reversed, and the catch light appear in about 3 o’clock position. The Split Lighting is very effective for bringing out the character of certain faces in a variety of contrast ratios, and it is also particularly effective when a subject is photographed wearing a hat or a cap with a visor. Forty Five Degree Lighting (Twin Key Lights)
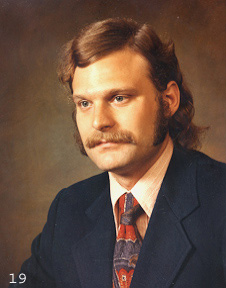
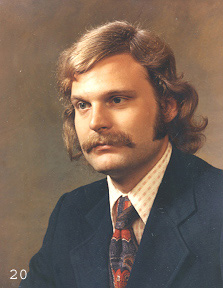
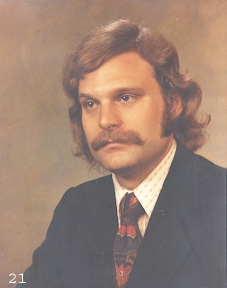
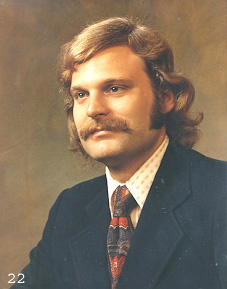
Photo #18 shows still another short lighting pattern. It is identified as the Forty-Five Degree Lighting, simply because the key light is directed at the front of the subject’s face from a forty five degree angle. This lighting pattern is recognized by the triangular highlight that appears under the eye on the shadow side of the face. It is achieved by first, positioning the key light to form the Modified Butterfly Lighting pattern on the face, as shown in photo #19. Then raising the key light to a higher level and moving it still farther to the side away from the camera, until the shadows on the broad side of the face close in to a point where only a triangular highlight remains under the eye, as in photo #18. The result, as you see here, is a strong, interesting lighting effect. But when the key light is positioned where needed to create this lighting pattern, the subject’s eyes appear shaded and dull, because the light fails to reach the eyes from that position, and the subject’s expression remains obscure when this lighting pattern is used in the manner shown in photo #18. Note however, how the Modified Butterfly Lighting in photo #19 brings a sparkle to the eyes and projects the lifelike quality of the subject’s expression. Comparing the lighting patterns in these two photos clearly indicates that, when a desired portrait lighting pattern must be achieved using a single main Key light, the Modified Butterfly Lighting, as shown in photo #19, is the most effective choice. Twin Key Lights However, a very effective Forty Five Degree lighting can be achieved by adding, what I call a secondary Key light, as I will explain now. First, the primary Key light is positioned to achieve a Forty Five Degree lighting on the subject’s face, as shown in photo #20. The unsatisfactory aspect of this lighting is, of course, the lack of detail and the resulting dull effect in the subject’s eyes. Then, a secondary Key light is brought in, and placed where it will create a Modified Butterfly pattern on the face, thus placing catch lights in the eyes, as shown in photo #21. But this secondary light must be of less than half the intensity of the primary Key light, as reflected in the much darker flesh tones of this photo, allowing the Forty Five degree lighting pattern created by the primary Key light, to remain the dominant lighting when the two lighting patterns are combined, as shown in photo #22. Photos 20, 21, and 22 shown below, illustrate above paragraphs.
I’ve always used this twin Key light created Forty Five Degree pattern of lighting for head and shoulders and three quarter length poses of men, as well as of women, in appropriate contrast ratios. And I always used the Modified Butterfly lighting when photographing Children and Brides. I also used Split Lighting for occasional dramatic effects. Clearly, these portrait lighting patterns are equally effective with male or female subjects, and children too. Varying the contrast ratios of these patterns as they are applied to men, or women, or children, allow you to manipulate your lighting effects to fit your subject. One final comment about positioning the key light: This is a subject long overdue for discussion with developing photographers in search of knowledge. They attend programs and demonstrations of portrait lighting, and from what I’ve seen, their attention appears to concentrate on where and how the speakers position their lights. Learning what portrait lighting is, and what it does, begins at the other end. It begins by becoming aware how certain groupings of highlight and shadow patterns bring out the three dimensional quality and shape and form of a subject’s facial features. You need to learn to see and recognize the specific details of each lighting pattern we discussed, as it appears on the subject’s face. Then you will know exactly where to place the key light to achieve that effect. When you learn to control the placement of the key light by watching its effect on the subject’s face, you will be able to position it at a proper height at any distance from the subject, depending on the pose. |


Rehosted on:
