|
The Zeltsman Approach to Traditional Classic Portraiture Chapter 8 Classic Portraiture of Family Groups Years ago, when we became a 100% Portrait Studio, a fair number of our bookings were for group portraits of children and family groups. Lacking experience in group portraiture, I did what other photographers were doing. I tried to arrange everyone together into as pleasant a grouping as possible. Although our clients seemed pleased to have the group portrait they wanted, I did not like this method of fitting people together to form a group. I felt this approach obliterated any individuality between the members of the family, and I began to visualize a more effective way of portraying a family group. That led to the development of what became my particular style of Classic Group Portraiture.
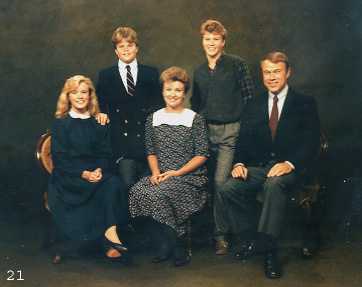
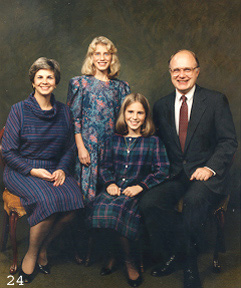
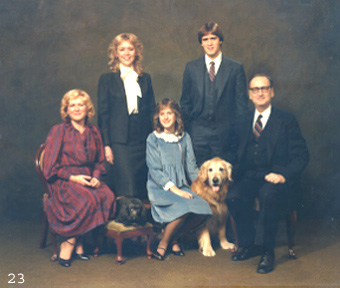
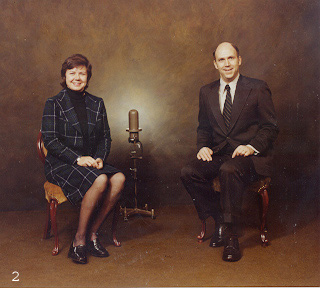
When you examine the enclosed examples of family groups, you’ll understand the effects of this method of posing. At first glance, these portraits look as if they are no more than a grouping of individual portraits of each member of the family. Each figure, child or adult, is in an appropriate masculine or feminine arrangement, seated or standing, and could, indeed, be photographed alone as they are posed. But then, looking at the whole picture, you see an interesting grouping of faces with pleasant expressions, and the figure of each individual member of the family reflecting the age and height relationship between them. A truly informative and cohesive portrait of the family, yet, the individuality of each person in the group remains fully evident. Note also the arrangement of feet and legs, and how hands are posed in these photographs. And note the lighting on all the faces, provided by a single frontal key light, raised high enough to achieve good modeling. My bounce light system provided the basic fill lighting in all of these portraits. (Chapter 12) Detailed Explanation and Illustrations of my approach to arranging family groups Instead of posing a group from the center out, I start at the ends, and build toward the center. Depending on the number of people in the group, I establish the perimeter for the arrangement by placing one person at each end, leaving sufficient space between them for adding the remaining members of the family. Everyone is positioned in the arrangement in either a masculine or feminine pose, seated or standing. I always begin by posing Mother seated in a chair at one end. Then, Father is posed seated in a chair at the other end of the perimeter. From then on the remaining members of the family are posed within the area between the parents...one at a time, seated or standing, where needed to achieve a desired grouping. After Mother and Father are in place, my efforts are focused entirely on arranging an interesting grouping of faces. That becomes a guide as to where and how to position and pose the bodies. Their figures must support the faces in a desired place within the group. The end result, as you may see when you look at my group portraits, is indeed, a pleasing cluster of faces and expressions.
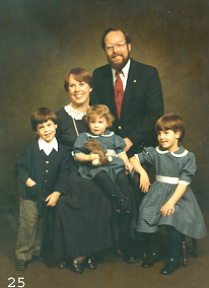
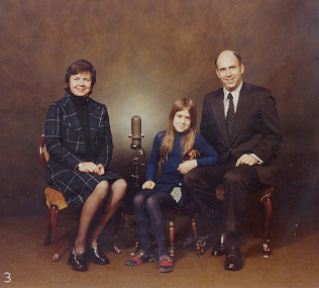
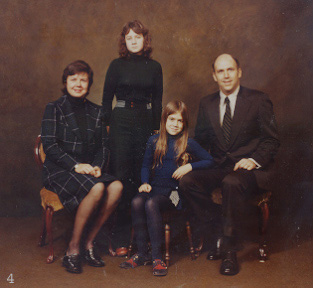
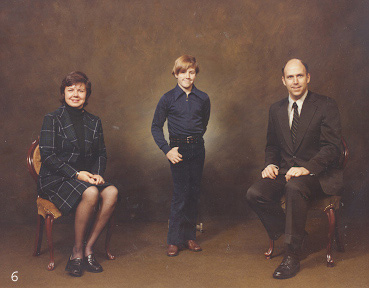
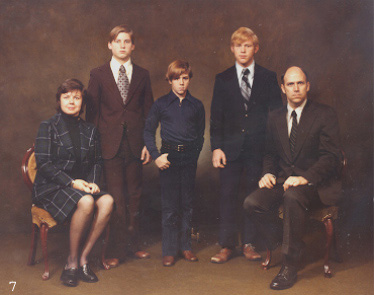
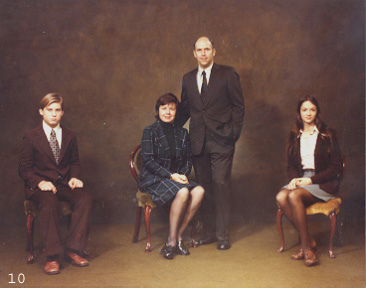
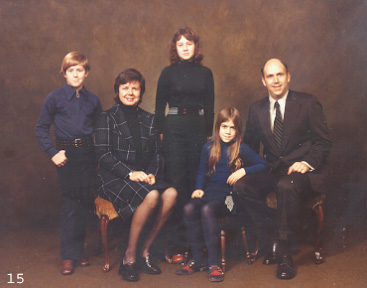
As illustrated above, I began arranging that family of four by posing Mother seated in a chair at one end, Then, Father was posed seated in a chair at the other end of the perimeter as planned for a group of four, and the two children were posed, one at a time, in the remaining planned space between the parents. Note one face is positioned at a level above the parent’s faces, and the other below, to form an interesting cluster of faces throughout the picture area, rather than a line up of faces along the top. The next four photos show, in a step by step progression, the same approach in arranging the group of seven. Estimating the perimeter of the space needed for this group, Mother was posed seated in the chair at one end, and Father at the other. And the five children will now be arranged in the space between the parents.
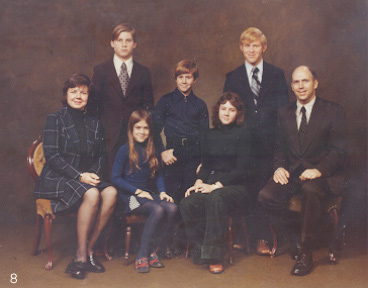
Important note: As I mentioned before, after Mother and Father are in place, my concern at this point is not where or how to pose the remaining members of the family. My efforts are now focused entirely, on what is the essence of my approach to portraiture of groups. Arranging an interesting cluster of faces. And that becomes the guide to where and how to pose the subjects’ figures to position the faces in a desired place, as in photo #8. Arranging an interesting grouping of faces: How to do that? You show faces on different levels throughout the picture area. (Photo 8) Never a row of faces next to each other along the top, and only bodies below. Never have two faces next to each other at the same height, unless they are separated by another figure of different height. Never faces on lower level lined up directly under faces at upper level Back to arranging this family of seven now. To avoid the need for rather drastic up and down scrolling you’d have to do to keep track of my comments here, and checking against the photos up above, here are the four photos again, to make it easier to get to.
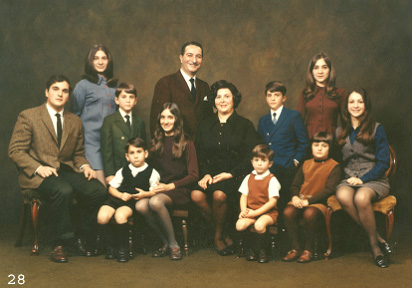
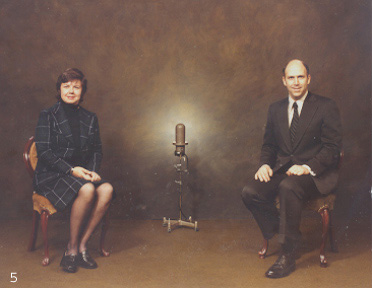
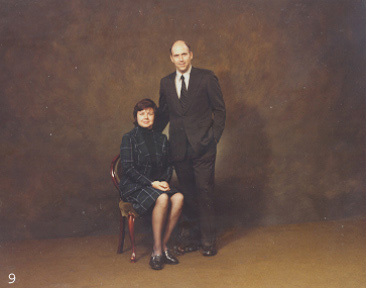
Mother and Father are now posed at each end, and the perimeter for arranging this group is established (Photo #5). I chose that boy for the center spot (in photo #6) because of his height, which placed his face approximately on a level with the faces at each end. That one face at that level becomes the center of the group, and the two open spaces on each side of the boy are exactly right for placing the two faces at the upper level (Photo #7), and the two remaining faces at lower level (Photo #8). Note how I used the ages and different heights of the children to place the faces where I wanted them. Result: A very handsome looking family. Your interest is on the nice faces, not on bodies. Another way: The above described arrangement of a family group begins by first posing Mother and Father at each end, thus establishing the perimeter of the group, in this case a Family of Eight, and the six children would then all be posed in that planned space between the two parents. I find that approach very effective. That is how the family of seven, in photo #8 were arranged, and I almost always begin arranging a family group that way. But occasionally, things just don’t seem to fall into place with this approach. When that occurs I begin by posing the parents in the center. Mother is seated, and Father is standing along side. Then, I establish the working perimeter for the group by placing a member of the family at each end. And from then on, the remaining members of the family will be posed in the spaces between the parents and the people at each end.
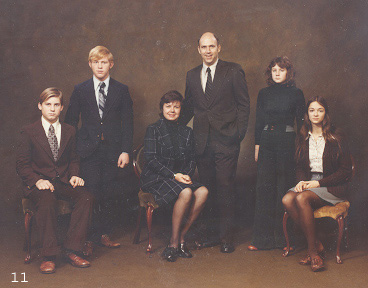
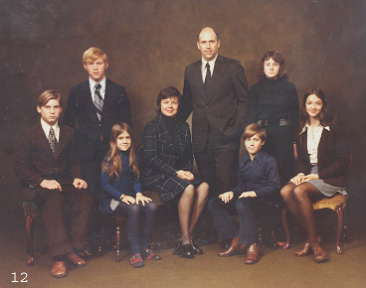
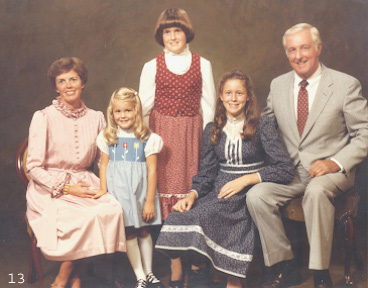
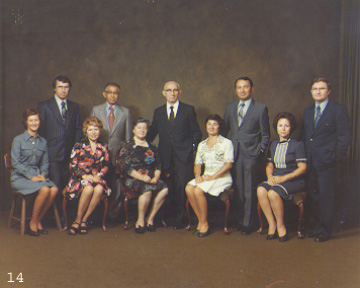
Photo #10 shows the basic start of arranging a grouping of eight people as illustrated in photo #12, and the end result of that arrangement, as you see, is the compositionally interesting cluster of the eight faces. Remember, each face and the figure supporting it is positioned where needed, one at a time, at the upper levels and the low levels within those spaces between the parents and the two end figures. Just keep looking at these photos, and you’ll almost feel where you’d like to put each face in the composition. Important point: I arrange all groups, large or small, in a single row. No second rows. Look at all my group portraits throughout this chapter, and you’ll see all the faces appear in a single plane (no second row). And also, that single row is in a very slight curve, rather than an absolutely straight line across. The three posing arrangements we’ve discussed, showed how a family of four, family of seven, and a family of eight were arranged, to create an effective cluster of faces, and also showing the figures that support them. The primary point of interest in these portraits is the grouping of the faces. How do we achieve that? Simple! Dark clothing, against dark background. No distractions to compete with the faces. New topic now: Yes, a clothing discussion meeting, usually with Mother, at the studio, several days before the booked date for the sitting, to discuss what everyone will wear. Explaining the need for coordinating colors and tones of the clothing, she is then asked to bring a selection of planned clothing for everyone several days before the scheduled date, to give her time to make any needed changes. Every one of my group portraits throughout these chapters was preceded by such a meeting. As you see, the results vary. A respectable large percentage are fully successful in maintaining full attention on the cluster of faces. Most of the rest include some minimal distractions, that do not seem to compete with the faces for attention. But, of course, some very, very few clients know exactly what they want, and will not go along with our suggestions. Photo #13 below.
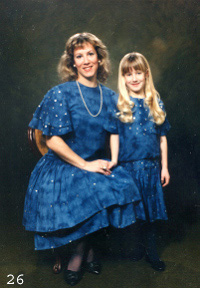
Portrait of 5 beautiful faces and nice smiles, when you find them among the clothing.. And next photo #14 showing the young lady who refused to dress like the other ladies. Interesting visual exercise: Just cover the white dress, and all the faces will pop right up. Remove cover from the white dress, and the faces disappear.
Clearly, photographing a grouping of people wearing dark tone clothing against a dark background, focuses attention on the faces in that group, which is the essence of my approach, and a studio environment is an ideal place to do it. All the group portraits displayed throughout these chapters were made in our studio. |
|
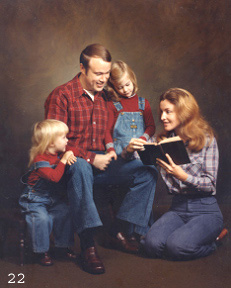
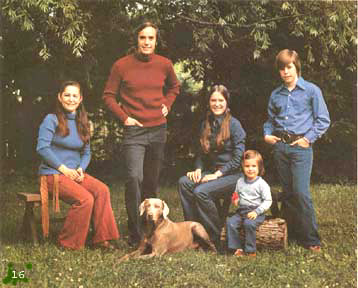
And that raises a question? What do my instructions, illustrations, and explanations mean to you when you don’t have a studio? You work on location, mostly outdoors, and sometimes in homes, etc.. No dark background, nor coordinated dark tone clothing. Answer: No matter where you photograph people, and regardless what facilities and equipment you may have to use, you still need to know how to pose people effectively, singly or together. These chapters provide that information, as well as other important related procedures you may use, no matter where you work. Then again, if you do have a studio, you might like to set up your camera room as I did mine, with a bounce light system as a permanent fill light (Chapter 12), and be as happy as I’ve been for over 50 years. During those 50 years, we served the families of the surrounding communities where we lived, with my brand of traditional classic portraiture, displayed throughout these chapters, all obviously made at the studio. Occasionally, however, some clients insisted on an outdoor setting, and I want to show you a few examples of how I kept the same classic approach outside the studio on location.
As you compare the two photos, you can see that I apply the same principles to family groups outdoors as well as indoors. This portrait clearly illustrates that my posing approach in outdoor groupings is exactly the same as in the studio There is one main difference, however, when I pose groups outdoors, I separate the figures to allow the background into the overall composition of the grouping.
The four photos above clearly illustrate that, traditional classic studio portraiture is equally effective in an outdoor environment. It involves the same posing principles, lighting, control of background, and composition. That, I believe, makes my point. It is not where you work, but how you work! Closing comment: Remember, the placement of faces - not the bodies - determines the effectiveness of the grouping. |

Rehosted on:
