|
The Zeltsman Approach to Traditional Classic Portraiture Chapter 9 Lenses and Camera Positions in Portraiture Note: This is not intended as a study of lenses of varying focal lengths and their uses. The only purpose of the following information, is to provide you with practical guidelines for selecting lenses of correct focal lengths related to portraiture, without actually identifying or recommending any particular lenses.
Most portrait poses fall into one of the following three categories. The close-up head and shoulders pose; the mid-distance three quarter length pose; and the long-distance full length pose. Thus, lenses of different focal lengths are required for maintaining natural perspective and for avoiding distortion when photographing poses in all of the above three categories.
Yet, all too often, photographers are apt to compromise on a focal length of a lens when photographing a particular portrait pose....achieving less than satisfactory results. When the focal length of a lens used to photograph a close-up head and shoulders pose is much shorter than normally required, it usually follows that the camera -to-subject distance is shortened to fill the negative properly. This often causes the subject’s nose or other facial features to become slightly distorted. Likewise, when too short a focal length lens is used to photograph a mid-distance three quarter length pose, a hand or hands resting in a forward position within the pose may appear too large. Conversely, when the focal length of a lens is much longer than normally required for a given pose, it may tend to flatten and reduce the effect of depth and three-dimensionality. Ideally then, it follows that lenses of recommended focal lengths be used to photograph close-up, mid-distance, and full length poses on the same film size. The following formula offers a practical guide for selecting effective focal lengths for each different portrait posing category, regardless of the format size you may be using.
The Formula The basic general-purpose lens normally supplied with most cameras, has a focal length that approximates the measurement taken diagonally from corner to corner of the film format. For example, the 6x6cm format camera would have an 80mm lens; the 6x7 camera would have a 90mm lens; the 35mm format a 40-55mm lens; and the 4x5 inch format would call for a 150mm lens. In portraiture, this so-called general purpose "normal lens" is used for all long shots such as full length poses, seated or standing, and for groups.
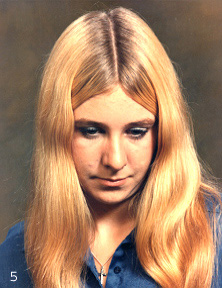
In estimating the minimum requirement for close-up head and shoulders portraits, the focal length of the lens should equal approximately double the measurement taken diagonally from corner to corner of the format. A somewhat longer focal length may be considered as maximum. For example, with the 35mm format, you may use a 105mm focal length as minimum or 135mm focal length as maximum; with a 6x6mm format use 180mm, or 250mm. When you photograph three quarter length (mid distance) portrait poses, use the shorter of the two focal lengths suggested above for each format. Note: No lens is complete without a lens shade or lens hood, regardless of where or how the lens is used. That is absolutely essential for assuring good, crisp negative quality. Camera Perspective You must know where to position the camera to properly photograph the subject. It is not simply a matter of aiming the camera toward the subject. Instead, one must place the camera at a special angle to achieve a planned perspective of the subject. Indeed, it is possible to alter the shape and form of the subject’s facial structure substantially, by varying the perspective, as illustrated here.
The photo on the left (#5) shows the effect of a high camera perspective. As you see, too much of the top of the head is showing. The face and the nose become elongated. The chin appears weak. Not enough of the neck is visible. The overall result is a distortion of the facial features to a point where the actual likeness of the subject becomes obscure. The photo on the right shows the effect of what happens when the camera perspective is too low. In that case, there is not enough of the top of the head showing. The face and the nose are foreshortened. The chin and the neck appear too prominent. Again, the facial features are altered sufficiently to obscure the actual likeness of the subject.
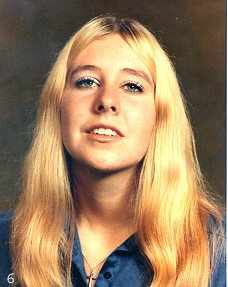
Now here, when you see what this young lady really looks like, you can understand the importance of using correct camera perspective in portraiture. Retaining an accurate likeness of a subject simply means that, all components of the subject’s facial features must be recorded by the camera in perfect balance with each other. None of the features should be distorted. When the camera is placed where it will record an absolutely normal view of the face, that camera position is referred to as a normal camera perspective. Important point: The height of the camera may therefore, fluctuate to whatever height may be needed to record a normal view of the face. It depends on how the subject is positioned for the portrait.
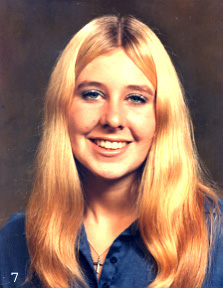
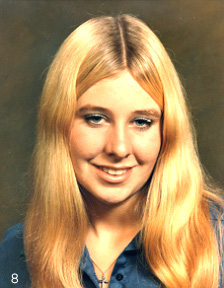
When you want to capture a recognizable likeness of a subject, obviously you avoid using an overly-high or overly-low camera perspective. But on some occasions, depending on a particular subject’s facial structure, you may decide to digress from the normal perspective. That would be, when you think the subject’s appearance may be enhanced by this change. For example, you may consider using a slightly higher camera perspective (as shown in photo #8, on the left) when you photograph a subject with a rather short, turned-up nose. This slight change will tend to enhance that subject’s appearance, without overly influencing the subject’s likeness. Conversely, when you photograph a subject with a rather long nose, you could enhance that subject’s appearance by using a slightly lower camera perspective (see photo #9 on the right). By and large, the normal perspective will always prevail. You will only make use of a higher or lower perspective when, in your opinion, the subject’s appearance may be enhanced by it. Note - in general photography such options are very useful as a means for creating unusual effects. But in traditional classic portraiture, digressing from the normal camera perspective should be carefully considered, and rarely used. Camera Positions for Normal Perspective Close-up poses: In head and shoulders poses, the camera position is always related to the subject’s face. After the pose is completed the camera is positioned at a height and tilt necessary to bring the film plane parallel to the facial plane. This can only be done when the pose is framed properly in the camera. That establishes a normal camera perspective for recording an undistorted likeness of the face, and is the correct camera height for that pose.
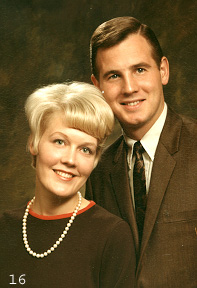
In close-up poses of two faces on different levels, you complete the pose first. Then position the camera at a height where the two facial planes will be in parallel with the plane of the film. At this point, because the faces are on different levels, the exact normal view of each face may have to be adjusted for the camera by a slight tilt of the head, up or down.
A few comments related to arranging close-up head and shoulders poses. Avoid any thoughts about where the camera may be positioned, until you have completely arranged a pose. Unrestricted, you may have a subject’s face tilted up or down as you feel about any particular pose. As a result, you will then position the camera at whatever height necessary to maintain normal camera perspective. Mid-distance poses: The method for establishing correct camera heights for three-quarter length poses is somewhat different. First, pose the subject either seated or standing, directed toward the basic camera position, using a masculine or a feminine composition that will support the view you want of the face. Then, after the pose is arranged and refined to your satisfaction, bring the camera to a height where its film plane can remain parallel with the plane of the overall body composition when the pose is accurately framed by the camera.
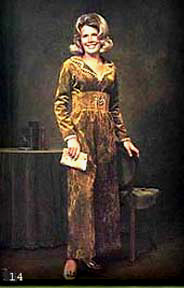
It is important to remember that, while the camera height in a close-up pose is related to the tilt of the subject’s facial angle, exactly the opposite holds true in a three-quarter length pose. Here, the camera height is based on how the body is posed. As a result of establishing the camera height this way, an important new factor emerges and must be dealt with. Each time you position the camera at a required height needed to record an undistorted view of a three-quarter length body composition, the facial angle you intend to photograph may not be accurately related to this camera position. In that case, to complete the pose you must adjust the position of the subject‘s head, bringing the desired facial angle to the camera. This procedure is applied to all three-quarter length portraits, in seated or standing arrangements. Full-length poses: The procedure for mid-distance poses also applies to seated full length poses, with only one difference. The subject’s entire figure is framed in the camera from a height where the film plane can remain parallel with the plane of the posed figure. The pose is then completed by tilting the head to bring the normal view of the face to the camera. Standing full length poses require a different approach. The camera must be positioned where the film plane will remain parallel with the standing figure when the pose is framed in the camera. That means the camera must be kept in an absolutely straight upright position, without tilting up or down. The reason for that, is to avoid distorting the figure.
When you have to tip the camera down to frame the pose properly, the figure appears foreshortened. When you tip the camera upwards to frame the pose, the figure is elongated. Hence, the need to keep the camera in a straight upright position is essential, in order to achieve a normal, undistorted portrayal of the figure. That establishes a normal camera position for standing full-length poses. Keeping the camera parallel with the figure places the camera at about the height of the subject’s waist level, which is normal. But, keep in mind the need to adjust the subject’s head at this point, to relate a normal facial view to the camera. Another reason to avoid tilting the camera is that full length portraiture, particularly on location, often includes surrounding objects, such as windows, doors, drapes, book shelves, etc.. Tilting the camera causes unpleasant distortion of vertical lines. Keeping the camera parallel with the surrounding area eliminates that problem. |
|
Two or More Subjects The above instructions for establishing a normal camera perspective in head and shoulders, three quarter length, and full length poses, apply when posing separate individuals. But when these guidelines are applied to groupings of two or more people, additional adjustments must be made. Close-up poses: When two subjects are arranged in a head and shoulder pose, their faces are usually placed on different levels to create an interesting composition.
Indeed, the height relationship between the two faces usually varies from pose to pose. Yet, in spite of appearing on different levels in the composition, both faces should ultimately appear in the portrait as if viewed from a normal camera perspective.
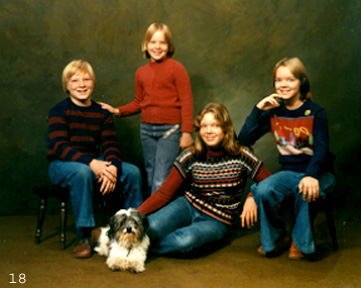
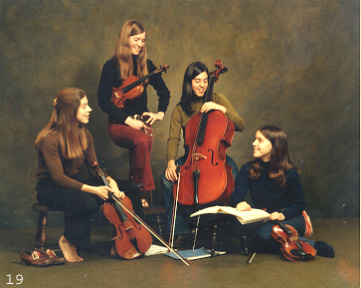
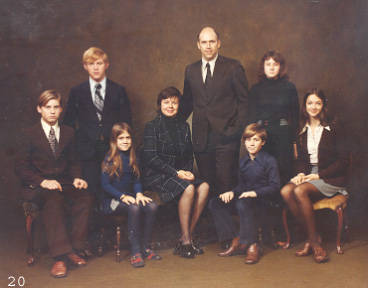
To achieve that effect, first, arrange and complete the desired pose. Then position the camera at a height averaging between the two faces. Now, adjust the head of each subject up or down as needed, to relate the normal undistorted view of each face to the camera. Full length poses of groups: If you’ve read my chapter on posing groups in this series, and looked at the examples of my group portraiture, you will understand that only full length poses allow me the space to create an interesting grouping of faces, rather than just bodies. You would have also read and saw that I arrange all groups in a single row. Look at all my group portraits.....all the faces are in a single plane. No second row!
Camera placement for groups: After the pose is arranged, the camera is positioned at a height level facing the general middle of the overall group. That establishes a basic camera perspective for recording the figures and faces looking normally proportioned and undistorted. Some closing comments: First, you probably wonder why I failed to mention relating each face in the group to the camera position. The answer is that the faces in full length groups are small. They are distributed throughout the picture area. So, when the camera is positioned facing the general middle of the overall group, I ask everyone to look toward the camera, and accept the likeness of all faces as they appear at that distance. This approach applies only to full length group arrangements. Things to remember for establishing a normal camera perspective 1. Close-up poses: The camera position is related to the subject’s face by placing the camera at a height and tilt to achieve a parallel between the facial plane and the film plane. 2. Three quarter length poses: For seated or standing subjects the camera position is related to the subject’s figure. It is placed at a height to properly frame the completed pose in the camera. Then, the subject’s normal undistorted view of the face is related to the camera. 3. Full length poses: When photographing a full length pose with the subject seated, the same principles apply as for three quarter length poses, detailed just above. 4. Standing poses: The camera is kept in a straight upright position without tilting up or down. It is positioned at a height (waist level) to frame the figure in the camera. Then, the subject’s face must be related to the camera height. |


Rehosted on:
