|
The Zeltsman Approach to Traditional Classic Portraiture Chapter 5 Posing Men - Part Two Introduction: In Chapter 4, I introduced my concept of one particular composition arrangement serving as the core of all poses of men. I named it the Masculine Composition, setting it apart from the Feminine Composition that will be introduced next, in Chapter 6. You saw how that masculine composition was used in posing the full length standing and seated poses. My reason for starting the posing discussion with full length arrangements, is that those two poses should be of particular interest to wedding photographers who do full length posing, and to portrait photographers for posing family groups....in the studio or on location. Now, in this Chapter, I will show you how this one masculine composition is used in arranging the traditional classic head and shoulders and three-quarter length poses.
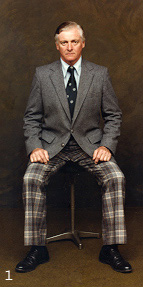
1. When you ask the subject to sit on a stool, he will most likely do so in a slouching posture. Begin by directing him to sit up and bring his body to its fullest height, as shown in photo # 1, and illustrates how a subject is seated during a facial evaluation and planning session (detailed in Chapter 3). The decision here is to arrange a pose to show the full front facial view, as well as his right two-thirds view of the face, and that calls for a turn of the body to his left. Important note: The head is never turned in opposite direction to the body in a Masculine Composition. 2. The first step, the turn of the body, is shown here in photo # 2. With his body turned to his left, you have determined that although this pose begins by showing the subject’s front view of the face, you are also planning to turn his head to his left later, to photograph the right two-thirds view of the face. For now, we’ll stay with the front view of the face. 3. Keep in mind that this is a head and shoulders pose. Now, in photo # 3 you see an adjustable height posing table added. While maintaining the same erect posture, he leans his body slightly forward to rest his hand on the table (adjusted to the proper height), achieving a slight lowering of his left shoulder. At the same time there is a bending of the elbow to establish the diagonal of the arm. The result is a classic head and shoulders pose. (Crop it to see it properly composed).
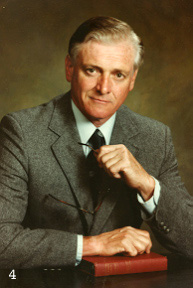
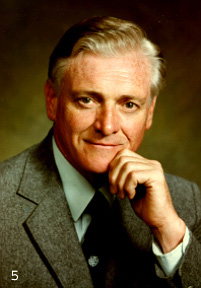
The reason for an adjustable height posing table is to allow to vary its height for placing a hand or hands at different heights in relation to the face. Look at photo # 4. There are two poses there. One, to show only his left hand, and another showing both hands. Either pose requires no change in the pose. The pose in photo # 5 however, does require the table to be raised, to bring his hand up to the face, without changing the pose. You don’t have an adjustable table? Use a few books on whatever table you do have to bring the hand to the required height. Photo # 6 is a three quarter length pose, and needs no table. This pose may also be cropped as a head and shoulders portrait. In Chapter 4, I showed how to arrange a variety of effective full length standing and seated poses of a man, by following a single composition pattern. The first step in arranging a pose in (what I call) the Masculine Composition is that slight turn of the subject’s body to one side or the other. Full length poses must show the subject’s well-balanced figure, and that controls the turn of the body. But head and shoulders arrangements offer considerably more flexibility, as you will see in the following illustrations.
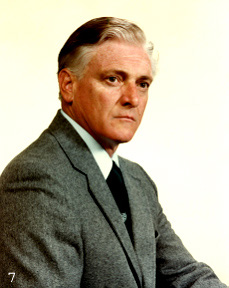
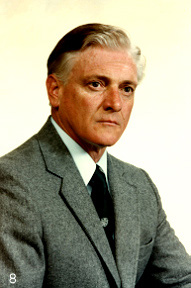
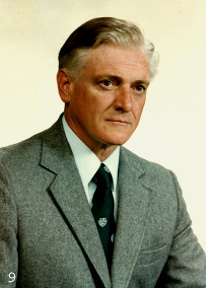
The principal function of a head and shoulders portrait is to highlight and feature one point of interest, the man’s face, and there should be no distractions diverting the viewer’s attention from the face. Look now at photo # 7. The man’s body is turned in a first step of arranging the masculine composition. But notice how that difference in size between the near and far shoulders draws attention away from the face. Of course, we can cut into the near shoulder to bring it into balance with the far shoulder, creating a real close-up of the face. That however, will leave the face hanging without sufficient support. Now in photo # 8, the body was turned back a bit to show more of the far shoulder, and we can cut into the near shoulder just enough to bring it into balance with the far shoulder. Crop it into an accurate head and shoulders, and you’ll see that your attention remains entirely on the man’s face. All the lines of the composition lead to it. No distractions. But there is more. In photo # 9, the subject’s body was turned slightly more, to show even more of his far shoulder. Now, by cropping the near shoulder to balance with the left shoulder, a more open cropping may be used to show more of the man’s body, if so desired. Review of the three important points of information in the above: 1. In head and shoulders portraiture, the turn of the body controls the size of the far shoulder. This, in turn, controls the cropping of the near shoulder. 2. That allows you to plan exactly the amount of the body in relation to the face. 3. The flexibility of being able to control the visual size of the body may be used very effectively with heavy set men. What a difference a tilt of the head can make!
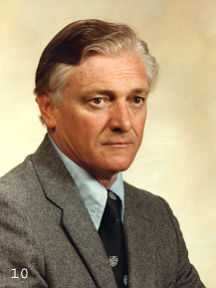
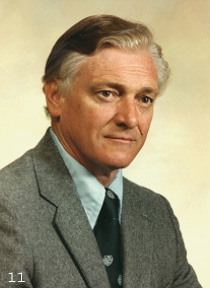
There is a subtle but very important difference between the two images in photos # 10 and # 11. As you look at them you’ll see that the portrait on the left is somehow not as comfortable looking as the one on the right. That has nothing at all to do with facial expression. It is caused by the placement of the head. The composition is exactly right, and is the same in both photos. but in the photo on the right, the man’s head is perpendicular to his shoulder line, an absolute requisite in a masculine pose.
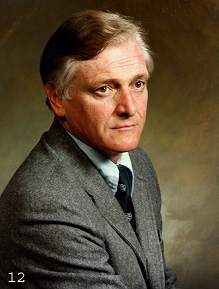
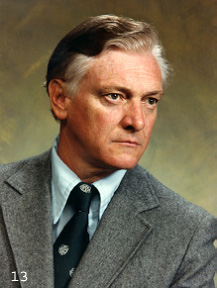
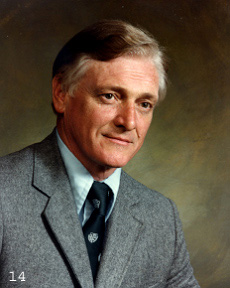
Three portraits featuring the two-thirds side view of his face. I doubt there is anyone, looking at the portraits in photos # 12 and # 13 who has not seen that exact pose many times. How do I know? I’ve been there. I, too was "creative" a long time ago. I, too posed people by the trial and error method. Now, look at the portrait in photo # 14, showing exactly the same view of the man’s face. Pure masculine composition, arranged in just a minute or so (no experimenting), looks comfortable, natural, with all lines leading the eye toward the point of interest, the face.
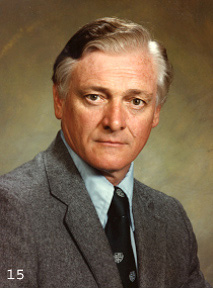
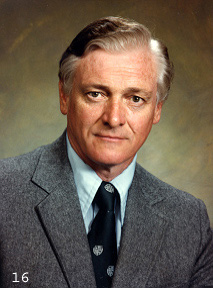
At first glance as you look at photos # 15 and # 16, you again see a stiffness in the portrait on the left. It is similar to another portrait we discussed earlier. But they are not the same. The previous example was a result of the head not being properly aligned with the shoulder line. This is different. The man’s head in this portrait, is properly aligned perpendicular to his shoulder line. In this situation, however, the stiffness on the right side of his face and neckline is caused by the turn of the body. And so, although the pose is properly arranged, the only way to eliminate this problem is by a turn of the body, as illustrated in photo # 16. You see here a very comfortable looking portrait of the man’s front view of the face. His body is facing directly front, instead of the mandatory turn that is part of the masculine composition. The point here is that because we can cut in to both of the subject’s shoulders in a close-up head and shoulders portrait of a front view of the face, the body may remain facing directly front. That’s an example of the flexibility of body turns I mentioned earlier when arranging head and shoulders poses. Note: Because we’ve not discussed the three-quarter pose as a separate issue, I remind you that the full length standing and seated arrangements "of the masculine composition" we’ve discussed in Chapter 4, are also photographed in three quarter length, with no change in the arrangement. In closing: A review how the head and shoulders pose is arranged in the masculine composition, following a facial evaluation and planning session. Decided, that the first pose will show the subject’s left two-thirds side of the face, and the full front of the face, which meant a turn of the body to his right, and the posing session begins. 1. Sitting on the stool, have the subject turn his body slightly to his right. Ask him to sit up straight to his fullest height, leaning forward slightly in the direction his body is facing, and shifting his weight on to his right thigh, which will lower his far shoulder. (The shoulders should never remain in a straight across horizontal line) He will need to support these leanings by the placement of his feet. 2. Start with the front view of the face, turned full front, and adjust the head, if necessary, to be absolutely perpendicular to the shoulder line. First pose is ready. After a few changes of expression, a mere turn of his head to his right to show the left two-thirds view of his face, and you have another portrait (no change of pose) 3. Moreover, an exact reversal of the above, arranged with the subject’s body in a slight turn to his left, to show the right two-thirds view of his face, and the full front face, is still the exact same one masculine composition. Question? Why does everyone, Men as well as Women and Children, look comfortable, relaxed, and seemingly un- posed, when in fact, they are all carefully and precisely arranged, within the guidelines of either the masculine or the feminine composition,. regardless whether it is a head and shoulders, three quarter or full length, seated or standing pose. Simple answer: You might have noticed my frequent use of the term "slight", as in "a slight turn of the head", or "slight turn of the body", or "a slight lean", etc., when I am explaining how to arrange that composition, because indeed, all moves of the figure, etc., to form the masculine composition, are never forced beyond their normal movement limitations. That is why all subjects arranged in this composition, appear natural, comfortable, and seemingly un-posed. |


Rehosted on:
