|
The Zeltsman Approach to Traditional Classic Portraiture Chapter 3 Facial evaluation and planning, prior to posing. Introductory Comments: At the start of my career as a portrait photographer many years ago, I began every portrait session, logically, by arranging the subject in what I felt to be an effective pose. And after establishing proper camera position, and desired lighting, photographed the subject, hopefully with a pleasant and interesting facial expression. But, after using that "posing first" approach at the start of a portrait session for some time, I became aware there seemed to be something wrong with that approach, and I finally realized what it was. People are photographed in different ways for a variety of reasons. It is important then, that the subject be arranged in a pose relevant to the planned function of that portrait, and the "posing first" approach is. indeed, best to follow then. Exception; CLASSIC PORTRAITURE. Consider the following: When a subject is arranged in a pose appropriately relevant to the style and function of that portrait, the pose is the primary point of interest, and the view of the face is whatever facial angle is available while the subject is holding that pose. To show other views of the face requires changing that pose. I, at that time, was pursuing a career in traditional Classic Portraiture where faces and expressions are the dominant point of interest of a portrait, supported by a relevant pose to complete the composition, and the "posing first" approach made no sense to me. I then reversed the sequence of my approach to beginning a portrait session, and followed it ever since. The new approach: Because the essence of Classic Portraiture is Faces and Expressions, I decided the first most important task is to decide which of the subject’s facial view, or views to photograph. And after that decision is made, arrange the subject’s figure appropriately posed to support that facial view. Classic Portraiture? All sessions begin with a facial evaluation period. Detailed instructions about how to do a facial evaluation follow now. Benefits of beginning a Portrait Session with a Facial Evaluation There are two primary reasons for evaluating the subject’s facial features at the start of a portrait session. First, we have an opportunity to decide which facial view we prefer to photograph. Secondly, the view we decide to feature indicates how the subject’s body needs to be arranged to form a compositionally effective foundation for that facial view. Aside from these two principal benefits, there are other less obvious ones. For example, most people usually feel self conscious and ill at ease before a camera, especially within an environment of a studio. Being surrounded by elaborate lighting equipment may also make people feel uncomfortable. And being posed immediately at the start of a session does nothing to ease their tensions. But when a portrait session begins with a facial evaluation, the problems that tend to make people feel ill at ease simply do not occur. Equipment is off to the side. The subject is not posed in any way, but while continuing a pleasant relaxed conversation, is invited casually to sit down on a stool, and the Evaluation Session (that will be detailed a bit later in the Chapter) begins. The Five Facial Views
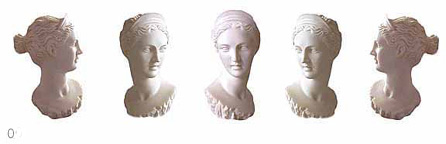
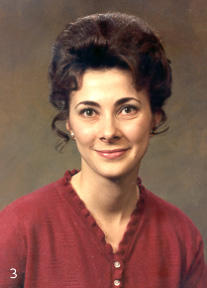
Aside from achieving an interesting portrayal of someone, the real objective of classic portraiture is to capture and document a subject’s recognizable likeness. To understand why I use the term "recognizable" likeness, consider the following. You may certainly photograph a person from different angles, showing a variety of facial views. And, of course, each of those facial views does indeed represent that person’s likeness as seen from that particular angle. But, in fact, there are only five specific facial views that actually reflect a subject’s likeness accurately....thus unmistakably identifying that person in the portrait. And those five specific facial views, as shown in the following photos of the young lady, also apply to facial angles of men and children. I refer to them as the "five recognizable facial views". See the following illustrations. The Profile
The profile must show its precise contour. The slightest turn of the head to either side, destroys the delicate lines of a profile, and therefore its recognizable likeness. The two-thirds side View
The proper identification of a side view of the face, is more accurately identified as the two-thirds facial view, because actually, it shows only two of the three planes of the face.....the front and one side. See photos! The head is turned to the side until only the precise front plane of the face is showing accurately, and one side plane. Front facial view
A front view of the face must be balanced from ear to ear, as shown here in this photo. Any slight change from this exact front facial angle, changes the shape and form of the facial features, and is no longer an accurate recognizable likeness of the front facial angle. Important: To ensure that our completed poses, supporting either of the five recognizable facial views are accurately recorded, we must remain at the camera when making exposures. Lighting for a Facial Evaluation Session In a camera room, good overall illumination is essential for conducting facial evaluations, as well as for posing. Don’t depend on your portrait lighting equipment to provide that illumination. The lighting supplied by these units is too directional. It creates highlight and shadow patterns on a subject’s face that prevents a proper evaluation. The general overall camera room illumination should, therefore, be as shadow- less as possible, and fairly bright. I have found that fluorescent lighting is best for that purpose, because it provides lots of good soft light at minimal cost. The evaluation and planning session to decide how to photograph the subject should take no longer than about 10 minutes or so. Then, as you turn to posing, you’ll also find it most convenient to pose the subject in a well-lighted room. Finally, when the pose is arranged, you switch off the overall room illumination, turn on the lighting equipment and proceed lighting the pose. How to proceed When I am ready to begin a portrait session, my first concern is to keep the subject from becoming self conscious, which is almost always the case when he/she is about to be photographed. But, as I explained earlier, whatever usually causes people to feel self conscious does not occur during this session, because talking and smiling pleasantly, I casually invite him/her to be seated on the stool in the posing area, facing the camera. And, standing behind the lowered camera, I ask the subject to sit up straight, to bring the body to its fullest height, and maintain that posture as we work. All done with lots of smiling and communicating with the subject as we proceed. The Why and How Approach to Facial Evaluation Obviously, the objective of a facial evaluation is to decide which facial view, or views, will portray the subject most effectively. To arrive at such a judgment we must be able to study a subject’s face from various angles and make comparisons. Important note: Keeping the subject seated still while you walk around silently studying his/her face without comment, will definitely cause the subject to feel self conscious. That’s not the way to do it! The right approach: The subject is seated on the stool with good posture, facing the camera that is lowered, to allow you an unobstructed view of the subject while you stand behind the camera. (Always smiling and communicating) direct him/her to turn the head only, first to one side, then to the other, several times, allowing you to evaluate both two-thirds side facial views, and the front view of the face, back and forth for comparisons, while the subject remains sitting comfortably in the same position. That is the most crucial time for communicating with the subject. At your very first request for a turn of the head, he/she realizes what you are doing, and you must begin to do it together. Share what you see. In order for you to see changes of expressions, smiles, etc.., the subject has to be involved. .Consider the psychological effect of conducting a facial evaluation in this manner. Indeed, it’s not likely he/she will feel self conscious while you work together as a team toward creating an effective portrait. Earlier, I identified five precise views of a face that assure an accurate portrayal of a subject’s recognizable likeness. With that in mind, there’s obviously no reason to look at any other views of the subject’s face. Actually, during this facial evaluation session, we look only at the front facial view, and at each of the two-thirds side facial views, because only these three angles of the face reflect a subject‘s absolutely recognizable likeness.. Now what about the two other important facial views, the profiles? Actually, the profiles, aside from offering aesthetically pleasing studies, do not truly represent a person’s recognizable likeness sufficiently. Thus, our primary concentration during a facial evaluation is on the front view and the two side views of the face. And because the subject could not possibly turn the head to either profile without moving the body with each turn of the head, at some point during the evaluating period, you may step off to either side of the subject for a moment, to glance at each profile, and decide to include an interesting study of a profile, in addition to the other views of the face you decide to photograph. Lets examine how you may use what you see during a facial evaluation when planning how to photograph the subject. The reason for evaluating facial features is to allow you to select a particular facial view, or views, that will reflect a meaningful portrayal of the subject. When you begin, the immediate purpose of the analysis is to discover any un-attractive features and imperfections in the subject’s face from that angle, and consider how to deal with it. Your subject is surely aware of that little problem, and will greatly appreciate knowing that you‘ve spotted it, and what you intend to do about it. The facial analysis is, therefore, a planning session, and the following examples will give you an idea how your choice of a facial view may be influenced by what you see during that period. |
|
The Actual Planning Important Notes: The evaluating and planning session I am introducing in this Chapter, is the important starting point of my approach to Classic Portraiture, as I explained in the beginning paragraphs of this Chapter. (You might review the fifth paragraph down from the top) Now, when you are ready to begin a portrait session, you should be in pleasant relaxed conversation with the subject, as you invite him/her to sit down facing the camera, as I described earlier, and the session begins. Do not just do things, but communicate and let the subject understand what you are doing. And now, the most important and necessary communication is essential when viewing and comparing a subject’s precise facial views. Here is why! Look at any of the three precise recognizable facial views of a Man or Woman. Serious expression first: Note the shape of the face, and the facial features. Do you know what will happen when you ask the subject to smile??? Everything will change! As it will change some more with a change of expression. This provides you unlimited choices for comparison in evaluating any one subject. You can understand now, my pointing our earlier, that we open the session with a subject sitting on a stool facing front toward the camera, and can turn the head in either direction to show the two-thirds side views of the face, any number of times, while remaining comfortably seated in the same position on the stool. A look now at how you use what you may see during a facial evaluation when planning a portrait of a subject. The actual reason for evaluating facial features is to enable you to select a particular facial view or views, that will reflect a meaningful portrayal of the subject. When you begin, the real immediate purpose of the analysis is to discover any negative or distracting features in a subject’s face from that angle. When you do, you consider how to deal with them. The facial analysis is, therefore, a planning session, and the following examples will give you an idea how your choice of a facial view may be influenced by what you see. Facial Features: You are looking at a subject’s exact front view of the face. You study the shape of the face, and the facial features, and tell the subject you’d like to see how a smile will change everything. And it surely does. Do the same with the two-thirds side views of the face, some smiling, some laughing, back and forth, some serious, making comparisons, sharing what’s interesting with the subject. 7 or 8 minutes, and you’ve decided which facial angle or angles you will photograph. And you’ll know how to arrange the proper poses to support your chosen facial views. (Chapters 4, 5, 6, & 7 for posing) Hair Style: You must also consider to what extent a subject’s hair style may influence your choice of facial view. Hair parted on one side may be a factor, because it can alter a subject’s appearance when viewed from different angles. The differences will guide you toward choosing the view that best represents a most attractive likeness of the subject. Eyes: Occasionally, looking at a subject’s full front view of the face, you will notice that one eye appears to be smaller than the other. How to handle this has been the subject of many discussions for years. Everyone, of course, agrees on using a two-thirds facial view to modify the appearance of that discrepancy. Some suggest that you should turn the smaller eye away from the camera. Others say just the opposite. However, you are now doing a facial evaluation, and must, and will, rely on your own opinion and judgment. When looking at a subject’s precise front facial view, you become aware of a slight size difference between that subject’s eyes, comment on it, (The subject is undoubtedly fully aware of this). And smiling pleasantly, you say to the subject "a smile changes the appearance of facial features, so, how about giving me a smile, and see what happens"? When the subject smiles, you may see a magical change. But whatever you see, go through the same procedure with each of the two-thirds views of the face. When you do that, you’ll be surprised to discover no problem with the eyes with some of the expressions. Do you care at this point about rules and what’s right or what’s wrong? No! You are looking at several options. The right choice of facial view or views and expressions will be right there for you to make your decision. No rules. Your own considered opinion will be the right thing to do. Respect your own judgment, and you’re on your way! Teeth: Occasionally, when you are studying a subject’s side view of the face, you may detect a tooth missing when the subject smiles. Yet, when you check the opposite side view, the teeth look good. This provides you with a clear choice for planning ahead. You’ll photograph the subject in a serious expression from the side where the tooth is missing, and smiling from the opposite side. This is a situation you share with a subject, who will appreciate you sensitivity and be ready with a smile when you ask for it. Other information: You will also gain some important insights about the subject each time you ask for a smile, because he/she is generally quite relaxed when you work together in this manner. A subject‘s reaction to your request for a smile should tell you quite a bit about the subject‘s personality.. For example, does he/she smile easily? Or, will a serious expression be more natural? Your impression of the subject at this time, can greatly influence not only what facial view you photograph, but also what expressions you’ll want to capture. Some people show quite a bit of their gums when smiling broadly. While this may be perfectly natural, it’s not particularly attractive in a portrait. When you are confronted with this situation, you should plan to photograph that person with a slight smile, or no smile. Many other situations will occur as you practice this procedure. In time, you’ll gain the experience to cope with all of them. Closing comments: Although my detailed explanation of the complexities of this procedure is quite long, I remind you that the actual time of this session should not exceed 10 minutes or so. No doubt this evaluation session will become highly productive after you learn to work with it. At the start, however, you must realize your mind will be too preoccupied with directing and communicating with the subject to allow you to digest what you see. But when you get used to handle that part of the procedure without thinking about it, your mind will become free to concentrate on spotting the good and the bad features of a subject’s face. |

Rehosted on:
